


The Lenovo 100e Chromebook Gen 4 comes with built-in write protection to safeguard system files, but advanced users often need to disable it for developer mode, custom firmware, or deeper system modifications.
We will discuss Commands to Disable Write Protection on the Lenovo 100e Chromebook Gen 4, along with the Types of Write Protection you may encounter. Whether you’re a developer or a tech enthusiast, understanding how to safely remove write protection is essential before making any low-level changes to your device.
What Is Write Protection on a Chromebook?
Write protection is a security feature built into Chromebooks that prevents users or software from modifying the firmware stored inside the device. Chromebook manufacturers use this protection to stop malware, unauthorized BIOS modifications, and system corruption.
When write protection is enabled, users cannot install custom firmware or make deep-level system changes. This security system is especially important in schools and businesses where Chromebooks are managed and protected from unauthorized modifications.
Why Disable Write Protection on Lenovo 100e Chromebook Gen 4?
Many users disable write protection because they want more control over their Chromebook. ChromeOS is lightweight and secure, but some advanced users prefer installing Linux distributions or experimenting with custom firmware.
The Lenovo 100e Chromebook Gen 4 is popular among students and developers because it is affordable and compact. After disabling write protection, users may be able to:
- Install Linux operating systems
- Flash custom BIOS firmware
- Run advanced developer tools
- Use dual-boot configurations
- Customize hardware behavior
Some users also disable write protection to repair firmware problems or recover damaged systems.
Important Warnings and Risks
Before starting the process, it is important to understand the possible risks involved. Disabling write protection changes core security settings of the Chromebook and may affect device stability.
You should know that:
| Risk | Explanation |
| Warranty Problems | Opening the Chromebook may void the warranty |
| Firmware Damage | Incorrect flashing can brick the device |
| Data Loss | Enabling Developer Mode erases local data |
| Security Reduction | ChromeOS protection becomes weaker |
| Hardware Damage | Internal parts can break if handled roughly |
If you are not comfortable opening electronics or using terminal commands, you should proceed slowly and carefully.
Things You Need Before Starting
Before learning lenovo 100e chromebook gen 4 how to disable write protection, prepare all necessary tools and files. Proper preparation reduces mistakes and makes the process easier.
You may need:
- Small Phillips screwdriver
- Plastic pry tool
- USB drive
- Stable internet connection
- Charger for the Chromebook
- Backup storage for important files
It is strongly recommended to back up all important documents because enabling Developer Mode usually resets the Chromebook completely.
How to Enable Developer Mode
Developer Mode is required before most firmware modifications can be performed. This mode removes some ChromeOS restrictions and allows access to advanced system functions.
The following section explains the basic process and important details related to Developer Mode on Chromebook devices.
Entering Recovery Mode
Start by turning off the Chromebook completely. Press the Esc + Refresh + Power buttons together. The Chromebook should enter the recovery screen after a few seconds.
Once the recovery screen appears, press Ctrl + D to begin switching into Developer Mode. The system may ask for confirmation before continuing.
Completing the Developer Mode Setup
The Chromebook will erase local data and restart several times during the setup process. This can take several minutes depending on the model and storage speed.
After the setup finishes, Developer Mode will remain enabled unless the user manually turns it off later.
Understanding Chromebook Security and Firmware
Chromebooks use multiple layers of security to protect firmware and operating system files. These protections are designed to prevent unauthorized access and ensure system integrity.
Firmware acts as low-level software that controls hardware startup and communication. ChromeOS checks firmware integrity during boot to prevent malicious modifications or corruption.
Most Chromebook security systems include:
- Verified Boot
- Firmware write protection
- Recovery mode
- Developer Mode restrictions
- CR50 security chip protections
Understanding these systems helps users avoid mistakes while modifying firmware.
Types of Write Protection
Chromebooks use different forms of write protection depending on the hardware model and generation. Some protections are physical, while others are controlled through software or security chips.
The following sections explain the major types of write protection commonly found on Chromebook devices.
Hardware Write Protection
Hardware write protection uses physical methods to block firmware modifications. Older Chromebooks often used a write-protect screw attached to the motherboard.
Some newer devices use battery-based protection systems instead of visible screws. Disconnecting the battery temporarily disables hardware write protection on supported models.
Software Write Protection
Software write protection uses firmware settings and system restrictions to prevent modifications. ChromeOS firmware may block flashing tools unless Developer Mode is enabled.
Terminal commands are often required to disable software protection. Users usually interact with tools like flashrom to check and modify firmware protection status.
CR50 Security Protection
CR50 is a security chip used in many modern Chromebooks. It manages security features such as verified boot, firmware validation, and hardware protection.
On some Chromebook models, CR50 can make firmware modification more difficult because it adds extra layers of security verification. Understanding CR50 behavior is important before attempting firmware flashing.
How to Identify Your Lenovo 100e Gen 4 Model
Not all Lenovo 100e Chromebook Gen 4 models use the same processor or motherboard design. Some versions use Intel hardware, while others use MediaTek chips.
You can identify your model by:
- Checking the sticker under the Chromebook
- Opening ChromeOS settings
- Using system information commands
- Looking at CPU details
Knowing the exact model is important because firmware files and write protection methods may differ between versions.
How to Open the Chromebook Safely
Opening the Chromebook carefully reduces the chance of damaging internal components. Work on a clean table with good lighting and avoid using excessive force.
The following section explains the safe approach to removing the bottom cover and accessing internal hardware.
Removing the Bottom Cover
Turn off the Chromebook and unplug the charger. Remove all visible screws from the bottom panel using a suitable screwdriver.
Use a plastic pry tool to carefully separate the clips holding the cover in place. Avoid metal tools because they may scratch or damage internal parts.
Protecting Internal Components
Avoid touching motherboard circuits unnecessarily because static electricity may damage electronics. It is recommended to touch a grounded metal object before handling internal parts.
Keep screws organized during disassembly so reassembly becomes easier later.
Battery Disconnect Method to Disable Write Protection
Many Lenovo Chromebook models disable hardware write protection temporarily when the battery is disconnected. This method is commonly used on modern Chromebooks without a visible write-protect screw.
The following steps explain how the battery disconnect method works and why it is important during firmware modification.
Disconnecting the Battery
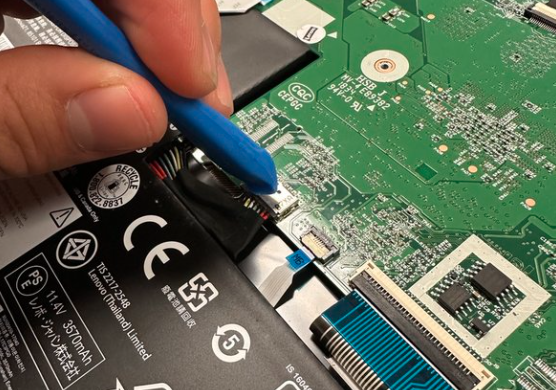
After opening the Chromebook, locate the battery connector attached to the motherboard. Carefully disconnect the battery cable without pulling aggressively.
Once disconnected, connect the Chromebook charger and power on the system using external power only.
Why This Method Works
Some Chromebooks automatically reduce hardware firmware protection when internal battery communication is interrupted. This allows advanced firmware tools to modify protected areas temporarily.
After firmware modifications are complete, the battery can usually be reconnected normally.
Commands to Disable Write Protection
After enabling Developer Mode and disconnecting hardware protection, users typically use terminal commands to disable software-level firmware protection.
Open Crosh using Ctrl + Alt + T and enter the following commands:
shell
sudo flashrom –wp-disable
These commands attempt to disable firmware write protection using the flashrom utility.
How to Check Write Protection Status
After attempting to disable protection, users should verify whether the process worked correctly. This helps avoid firmware flashing errors later.
Use the following command:
flashrom –wp-status
If write protection is disabled successfully, the terminal should show that protected regions are unlocked or disabled.
Installing Custom Firmware or BIOS
After disabling write protection, many users install custom firmware such as MrChromebox BIOS. Custom firmware can allow broader hardware compatibility and alternative operating systems.
Flashing firmware incorrectly can permanently damage the Chromebook, so users should read all instructions carefully before proceeding.
Custom firmware may provide:
| Feature | Benefit |
| Full BIOS Access | More advanced boot control |
| Linux Compatibility | Easier Linux installation |
| USB Boot Support | Boot from external drives |
| Legacy Boot Options | Alternative operating systems |
Always verify firmware compatibility with your exact Chromebook model.
Installing Linux or Windows on Chromebook
Many users disable write protection because they want to install Linux or Windows instead of ChromeOS. Linux is generally more compatible with Chromebook hardware than Windows.
Popular Linux distributions for Chromebooks include:
- Ubuntu
- Linux Mint
- GalliumOS
- Debian
- Fedora
Windows installation can be more difficult because some Chromebook drivers may not work properly.
Common Errors and Troubleshooting
Users may experience errors during firmware modification or terminal command execution. Most problems are caused by incomplete steps or unsupported firmware configurations.
Below are some common issues and possible solutions:
| Problem | Possible Solution |
| flashrom error | Recheck Developer Mode |
| WP still enabled | Disconnect battery again |
| Chromebook not booting | Restore recovery image |
| Black screen | Reflash compatible firmware |
| USB boot failure | Verify BIOS installation |
Reading error messages carefully helps identify the exact cause of problems.
Chromebook Recovery and Repair Tips
If something goes wrong, Chromebook recovery tools can help restore ChromeOS. Google provides recovery utilities that reinstall the operating system from a USB drive.
Important recovery tips include:
- Keep a recovery USB ready
- Save original firmware backups
- Use official recovery tools
- Avoid interrupting firmware flashing
Recovery methods may vary slightly depending on Chromebook generation and firmware type.
How to Re-Enable Write Protection
Some users decide to restore original Chromebook security after completing modifications. Re-enabling write protection improves security and reduces the risk of accidental firmware corruption.
Reconnect the internal battery if it was disconnected earlier. Some firmware settings may automatically restore protection after rebooting or reinstalling ChromeOS.
Users can also reinstall official ChromeOS firmware if they want to return the Chromebook to factory condition.
Safety Tips for Beginners
Beginners should work slowly and carefully during the entire process. Rushing increases the chance of mistakes and hardware damage.
Helpful safety suggestions include:
- Read guides fully before starting
- Keep firmware backups
- Avoid forcing connectors
- Use correct screwdriver sizes
- Charge the Chromebook fully
Patience is extremely important when working with Chromebook firmware modifications.
Advantages and Disadvantages of Disabling Write Protection
Disabling write protection provides more freedom but also introduces new risks. Users should understand both sides before modifying the Chromebook.
| Advantages | Disadvantages |
| Install Linux | Reduced security |
| Custom BIOS support | Risk of bricking |
| More system control | Warranty issues |
| Advanced customization | Complex setup |
| USB boot support | Possible instability |
The decision depends on the user’s technical experience and intended use.
FAQs
Does disabling write protection remove ChromeOS completely?
No, disabling write protection does not automatically remove ChromeOS. It only allows deeper firmware modifications that can later be used to install other operating systems if desired.
What happens if firmware flashing stops halfway?
Interrupted firmware flashing can corrupt the BIOS and prevent the Chromebook from booting properly. In severe cases, professional recovery tools may be required to restore functionality.
Will disabling write protection affect battery life?
The process itself usually does not affect battery life. However, installing another operating system or custom firmware may slightly change power management behavior.
Do I need another computer during the process?
Having another computer is recommended because it can help create recovery media, download firmware files, and access troubleshooting guides if the Chromebook becomes unusable.
Can I update ChromeOS after disabling write protection?
ChromeOS updates may still work in some situations, but custom firmware modifications can sometimes interfere with official updates and system recovery features.
Can I use external storage for Linux installation?
Yes, some users install Linux on external USB drives or SD cards instead of replacing ChromeOS completely. This method can reduce the risk of permanent system changes.
Is it possible to dual boot ChromeOS and Linux?
Yes, some advanced users configure dual-boot systems. However, setup complexity depends on firmware compatibility and available storage space.
Conclusion
Understanding lenovo 100e chromebook gen 4 how to disable write protection can help users unlock advanced customization features and alternative operating systems. The process involves enabling Developer Mode, understanding Chromebook security systems, disconnecting hardware protection, and using firmware commands carefully.
Although disabling write protection provides more freedom, users must understand the risks involved. Following safe procedures, backing up firmware, and working patiently can reduce the chance of damaging the Chromebook. Beginners should always research their exact model before making firmware changes or installing custom operating systems.