

A failing motherboard can bring your entire system to a halt, making it essential to diagnose the problem quickly and accurately. In this guide, we’ll walk you through everything you need to know about how to test a motherboard — from basic visual inspections to advanced diagnostic techniques.
We’ll cover How to Test a Motherboard with a Multimeter and help you decode those mysterious Beep Codes that your system throws when something goes wrong.
What Is a Motherboard?
A motherboard is the main circuit board inside a computer that allows all components to communicate with each other. It connects the processor, memory, storage devices, graphics card, and power supply into one complete system.
Without a motherboard, the computer cannot function because no hardware component would be able to transfer data or receive power correctly. Different motherboards also support different CPUs, RAM types, and expansion options depending on the computer’s design.
Signs Your Motherboard May Be Faulty
A failing motherboard can cause many unusual computer problems. Some issues appear suddenly, while others slowly get worse over time.
Here are some common signs of motherboard failure:
| Symptom | Possible Meaning |
| Computer will not turn on | Power delivery issue |
| Random restarts | Faulty motherboard circuits |
| Blue screen errors | Hardware communication problem |
| No display on monitor | GPU or motherboard issue |
| USB ports stop working | Damaged motherboard controller |
| Burning smell | Short circuit or overheating |
| Beep sounds during startup | Hardware detection errors |
Sometimes these problems can also come from RAM or the power supply, so proper testing is necessary before replacing the motherboard.
Tools Needed to Test a Motherboard
Before starting the testing process, it is important to gather the right tools. Having proper equipment makes troubleshooting safer and easier.
Some useful tools include:
| Tool | Purpose |
| Screwdriver | Open the computer case |
| Power Supply Unit | Provide stable power |
| RAM Stick | Test memory slots |
| CPU & Cooler | Required for POST testing |
| Multimeter | Check voltage readings |
| Flashlight | Inspect motherboard damage |
| Anti-static Wrist Strap | Prevent static damage |
Even simple tools can help you identify many motherboard issues without professional equipment.
Safety Precautions Before Testing
Testing computer hardware should always be done carefully because electrical components are sensitive. A small mistake can damage the motherboard permanently.
Before touching any internal component, unplug the computer from the power source and hold the power button for several seconds to remove leftover electricity. It is also a good idea to work on a flat, clean surface and avoid carpets because static electricity can harm computer parts.
You should also avoid forcing connectors or touching motherboard circuits directly with your fingers. Careful handling reduces the risk of accidental damage during testing.
How to Test a Motherboard Step by Step
Testing a motherboard involves checking each component one at a time to isolate the real problem. This process helps determine whether the motherboard is truly faulty or if another hardware part is causing the issue.
The following sections explain different motherboard testing methods in detail so you can understand how to test a motherboard properly and safely.
Visual Inspection of the Motherboard
A visual inspection is usually the first step in motherboard testing because physical damage is often easy to spot.
Check for Burnt Areas
Burn marks or dark spots on the motherboard can indicate overheating or electrical short circuits. These damaged areas may stop the motherboard from working completely.
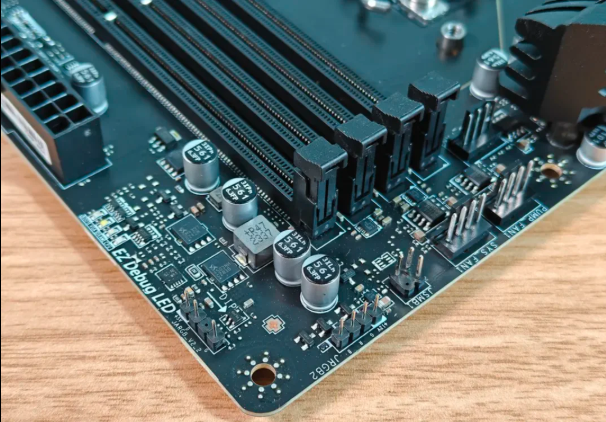
Look for Swollen Capacitors
Capacitors should have flat tops. If they appear swollen or leaking, the motherboard may experience instability, crashes, or boot failures.
Inspect Bent CPU Socket Pins
Bent CPU pins can prevent the processor from communicating with the motherboard correctly. This often causes no boot or repeated restart problems.
Check Damaged Ports and Slots
Loose USB ports, broken RAM slots, or damaged PCIe connectors can create hardware connection issues and prevent components from functioning normally.
Test the Power Supply First
A faulty power supply can behave exactly like a dead motherboard, so it is important to test the PSU before blaming the motherboard.
Disconnect unnecessary components and ensure the 24-pin motherboard connector and CPU power connector are attached securely. If the computer shows no signs of power, try another working power supply to rule out PSU failure.
Many technicians test the PSU first because motherboard troubleshooting becomes difficult without stable power delivery.
Breadboarding the Motherboard
Breadboarding means testing the motherboard outside the computer case using only essential components. This helps eliminate problems caused by short circuits inside the case.
To breadboard a motherboard, place it on a non-conductive surface like cardboard and connect only:
- CPU and cooler
- One RAM stick
- Power supply
- Monitor
If the motherboard works outside the case, the issue may come from improper mounting or a short circuit inside the PC case.
Check Motherboard Power Indicators
Many modern motherboards include LED lights that help diagnose hardware problems. These indicators can provide valuable information during troubleshooting.
Some motherboards have dedicated debug LEDs for:
| LED Indicator | Meaning |
| CPU LED | Processor problem |
| DRAM LED | Memory issue |
| VGA LED | Graphics card issue |
| BOOT LED | Storage or boot problem |
If no LEDs light up at all, the motherboard may not be receiving power properly.
Understanding Beep Codes
Beep codes are audio signals produced by the motherboard during startup. These sounds help identify hardware problems before the operating system loads.
Different BIOS manufacturers use different beep patterns, but common meanings include:
| Beep Pattern | Possible Issue |
| 1 short beep | Normal startup |
| Continuous beeps | RAM problem |
| 3 short beeps | Memory failure |
| 5 beeps | CPU issue |
| No beep | Motherboard or PSU problem |
Listening carefully to beep patterns can help narrow down the exact hardware issue.
Testing RAM Slots
Faulty RAM or damaged RAM slots can stop a computer from booting properly. Testing memory is an important part of motherboard diagnosis.
Test One RAM Stick at a Time
Insert only one RAM stick and attempt to boot the computer. If the system works, test the other stick separately to identify faulty memory.
Try Different RAM Slots
Move the RAM stick to another slot to check whether a specific RAM slot is damaged. A faulty slot may prevent memory detection even if the RAM itself works perfectly.
Testing CPU and CPU Socket
The processor and motherboard work closely together, so CPU-related problems can sometimes appear like motherboard failure.
Signs of CPU-Related Issues
Common symptoms include overheating, system shutdowns, or failure to complete POST during startup.
Reseating the Processor
Remove the CPU carefully and reinstall it correctly. Improper installation may prevent proper contact with the motherboard socket.
Checking CPU Power Connector
The CPU power cable near the processor socket must be connected securely. Without it, the motherboard may power on but fail to boot.
Testing with Integrated Graphics
If your processor includes integrated graphics, remove the dedicated graphics card and connect the monitor directly to the motherboard video output.
This method helps determine whether the graphics card is causing the issue instead of the motherboard itself. Sometimes a faulty GPU can completely prevent system startup or display output.
Testing with integrated graphics simplifies troubleshooting and reduces unnecessary hardware variables.
How to Test a Motherboard with a Multimeter?
A multimeter allows you to measure electrical voltage and detect short circuits on the motherboard.
What a Multimeter Checks
It measures voltage levels and verifies whether the motherboard receives correct power from the PSU.
Testing 24-Pin ATX Connector Voltage
You can test voltage pins on the motherboard power connector to ensure proper power delivery from the PSU.
V=IRV = I RV=IR
VsV_sVs
V
RRR
Ω\OmegaΩ
I=VsR=12.0 V6.0 Ω=2.00 AI = \frac{V_s}{R} = \frac{12.0\,\mathrm{V}}{6.0\,\Omega} = 2.00\,\mathrm{A}I=RVs=6.0Ω12.0V=2.00A
Vs = 12.0 V+-R = 6.0 ΩI = 2.00 A
This electrical relationship helps explain how voltage and current behave during hardware testing.
Checking Motherboard Short Circuits
A multimeter can also detect short circuits by testing continuity between motherboard components. Unusual readings may indicate damaged circuits or failed capacitors.
Testing Motherboard Ports and Slots
Motherboard ports and expansion slots should also be tested individually because damaged connections can create system instability.
Test USB devices in different ports to check functionality. You should also test storage drives using different SATA ports and verify whether PCIe slots detect graphics cards properly.
Audio ports, network ports, and front-panel connectors should also be inspected for physical damage or loose connections.
BIOS Troubleshooting
The BIOS controls hardware communication during startup. Incorrect BIOS settings or corruption can cause boot problems that look like motherboard failure.
Resetting the BIOS to default settings can solve many issues. This is usually done by clearing the CMOS battery for a few minutes before reinstalling it.
Updating the BIOS may also improve hardware compatibility and system stability, especially when using newer CPUs or RAM modules.
Common Motherboard Problems and Fixes
Motherboards can fail due to overheating, electrical damage, dust buildup, or aging components. Understanding common issues helps simplify troubleshooting.
| Problem | Possible Fix |
| Computer not powering on | Test PSU and connectors |
| Random crashes | Check overheating and RAM |
| USB ports not working | Update drivers or inspect ports |
| No display | Test GPU and monitor |
| Boot loop | Reset BIOS or test RAM |
Sometimes simple fixes like reseating hardware or clearing CMOS can restore normal system operation.
When to Call a Professional Technician?
Some motherboard issues require advanced repair skills and professional diagnostic equipment. If you notice burnt circuits, damaged traces, or severe liquid damage, professional repair may be necessary.
You should also contact a technician if the motherboard still fails after testing the power supply, RAM, CPU, and BIOS settings. Advanced electrical repairs often involve soldering and specialized tools that beginners may not have.
Professional diagnosis can save time and prevent accidental damage caused by improper repair attempts.
FAQs
Why does my computer freeze randomly?
Random freezing can occur because of overheating, failing RAM, BIOS issues, unstable power delivery, or motherboard hardware faults.
Can outdated BIOS cause motherboard problems?
Yes, outdated BIOS versions may cause compatibility issues with newer CPUs, RAM, or graphics cards and can sometimes lead to system instability.
What is the easiest way to test a motherboard?
The easiest method is breadboarding with minimal hardware components and checking for POST, beep codes, or debug LEDs.
Can motherboard problems cause internet issues?
Yes, if the onboard network controller is damaged, the motherboard may fail to detect Ethernet connections or internet hardware properly.
Should I replace or repair a faulty motherboard?
If repair costs are high or the motherboard is very old, replacement is often the better long-term option. Minor problems may still be worth repairing.
Is it safe to update BIOS during troubleshooting?
Yes, but BIOS updates should only be done carefully with stable power because an interrupted BIOS update can permanently damage the motherboard
Does resetting BIOS delete files?
No, resetting the BIOS only restores motherboard settings to default values. It does not erase files stored on your hard drive or SSD.
Conclusion
Understanding how you test a motherboard can help you diagnose computer problems more accurately and avoid replacing working components unnecessarily. Proper motherboard testing involves checking physical damage, testing power delivery, inspecting RAM and CPU connections, and troubleshooting BIOS settings carefully.
Many motherboard problems are caused by simple hardware issues like loose cables, faulty RAM, or power supply failure. By testing components step by step, you can isolate the exact problem and determine whether the motherboard truly needs replacement.